
If you’ve ever watched a volleyball match and noticed players shuffling into specific spots on the court between plays, you’ve already seen base positions in action… you just might not have known what they were called.
Understanding base positions is one of those things that separates players who react from players who anticipate. It’s the difference between scrambling to dig a ball and already being in the right spot when it arrives.

And I get it. It can feel like there’s a lot going on. Six players, constant rotations, different defensive systems… it’s easy to feel a bit lost.
But after 15+ years of playing and coaching volleyball, I can tell you that base positions are actually one of the simpler concepts to learn once someone explains them properly. And that’s exactly what this guide is going to do.
I’ll break down every base position by player role, show you how they change depending on your team’s defensive system, cover the movement patterns and reads that separate good defenders from great ones, and give you three drills to practice it all.
Whether you’re a player trying to understand where you should be standing, or a coach looking for a clear reference to hand your team, this one’s for you.
Let’s begin!
What Are Base Positions in Volleyball?
A base position is the default location on court that each player returns to whenever the ball crosses the net to the other side.
Think of it as your “home” spot. After your team serves, after a completed rally, or any time the opposition has possession, every player on the court should be resetting to their base position.
This matters for three reasons.
First, it puts your team in optimal defensive coverage. When all six players are in their correct base positions, there are no massive gaps on the court for the opposition to exploit.
Second, it creates faster transitions. Players who start in the right spot can move to dig, block, or attack far more efficiently than players who have to cover extra ground because they were standing in the wrong place.
Third, it builds consistency. Base positions give your team a repeatable structure. Instead of six players freelancing and hoping for the best, everyone knows exactly where they should be and what area of the court they’re responsible for.
Base positions are not the same as volleyball positions (the roles like setter, libero, outside hitter) or volleyball rotations (the order players move around the court). They’re the physical locations on the floor that each role defaults to within any given rotation.
If you’ve ever looked at a list ranking the hardest to easiest positions in volleyball, a big part of what makes some positions harder is the complexity of their base position responsibilities.
Understanding the Court Zones (Positions 1-6)
Before we get into where each role stands, you need to understand how the court is numbered.
Every volleyball court is divided into six zones, numbered 1 through 6. The numbering starts at the back right of the court (from the player’s perspective) and moves counterclockwise.
- Position 1: Back right (serving position).
- Position 2: Front right.
- Position 3: Front center (middle of the net).
- Position 4: Front left.
- Position 5: Back left.
- Position 6: Back center (deep middle).
The front row consists of positions 2, 3, and 4. These players are responsible for blocking and attacking at the net.
The back row consists of positions 1, 5, and 6. These players handle serve receive, defense, and back row attacks.
As your team rotates through volleyball rotations, each player moves through all six zones over the course of a set. But regardless of which zone a player is physically rotating through, their base position within that zone depends on their specific role.
That’s what we’ll cover next.
Base Positions by Player Role
This is the core of the guide. Each role has specific base positions depending on whether they’re in the front row or the back row. Let’s break them down one by one.
Middle Blocker Base Position
The middle blocker is your team’s anchor at the net in the front row, and one of the trickiest positions to play from the back row.
Front Row Base Position

When in the front row, the middle blocker’s base position is at the center of the net in zone 3. They should be roughly one arm’s length from the net with hands up, ready to block in either direction.
The middle blocker needs to read the setter and react quickly, sliding left to close the block with the outside hitter at position 4 or right to close with the opposite hitter at position 2. Their starting position at dead center gives them the shortest path to either pin.
Back Row Base Position

When the middle blocker rotates to the back row, their base position shifts to deep zone 6 (back center). They’re responsible for covering tips behind the block, deep cross-court attacks, and line shots depending on the defensive system your team runs.
In most systems, the middle blocker in the back row gets substituted out for a libero or a defensive specialist. But if they stay in, zone 6 is home.
Libero Base Position
The libero is your team’s best passer and defender. They wear a different color jersey and cannot attack the ball above net height. If you’re curious about why this role was created, or you’re a shorter player wondering where you fit, the libero is often considered one of the best positions for short players.
Base Position

The libero typically replaces the middle blocker in the back row and plays primarily in zone 5 (back left) or zone 6 (back center), depending on your team’s defensive scheme.
A good rule of thumb for the libero’s base is roughly 4 feet from the sideline and 4 feet behind the 10-foot line (attack line). This puts them in the sweet spot to cover both deep cross-court attacks and shorter tips that drop behind the block.
The libero’s base position is arguably the most important one on the court because they touch the most balls defensively. If the libero is out of position, the entire back row defense falls apart.
Outside Hitter Base Position
The outside hitter is usually your team’s primary attacker and one of the most versatile players on the court.
Front Row Base Position

In the front row, the outside hitter’s base is at the net in zone 4 (front left). They should be about one step off the left antenna, hands up and ready to either block or transition off the net for an attack approach.
When the setter delivers the ball, the outside hitter pulls off the net 3-4 meters for their approach. But their base starting point is always near the left pin of the net.
Back Row Base Position

When the outside hitter rotates to the back row, their base position moves to zone 5 (back left) or zone 1 (back right) depending on the rotation. They’re responsible for deep court defense and back row attacks (pipe or D-ball).
The key here is staying deep enough to cover hard-driven balls while being ready to move forward for tips and roll shots.
Opposite Hitter Base Position
The opposite hitter (also called the right side hitter) plays opposite the setter in the rotation.
Front Row Base Position


In the front row, the opposite hitter’s base is at the net in zone 2 (front right). They block against the opposition’s outside hitter and attack from the right side.
Their base should be about one step from the right antenna with hands up, ready to close the block with the middle blocker when the set goes to the opposition’s left pin.
Back Row Base Position

In the back row, the opposite hitter’s base shifts to zone 1 (back right). They cover deep line shots and cross-court attacks from their side, and are often used for back row attacks from the right side.
Setter Base Position
The setter is the playmaker, the player who touches the second ball on almost every rally. Their base position is unique because it needs to balance defensive responsibility with being ready to set.
Front Row Base Position

When the setter is in the front row, their base is at the net in zone 2 (front right). They’re positioned to block the opposition’s outside hitter, and they also need to be ready to execute a setter dump on the second contact when the opportunity is right.
Back Row Base Position

When the setter rotates to the back row, their base position is typically in zone 1 (back right). They need to stay close to the net target area so they can get to the setting position quickly, but deep enough to fulfill their defensive duties.
This is one of the trickiest base positions because the setter has to defend AND be ready to sprint to the net the instant the first contact is made. In a 5-1 rotation, the back row setter’s positioning is especially critical because they’re the only setter on court.
Understanding setter hand signals can also give you a better feel for how the setter communicates from their base position before each play.
How Base Positions Change by Defensive System
Here’s something most base position guides skip entirely: your team’s base positions aren’t set in stone. They shift depending on which defensive system your coach runs.
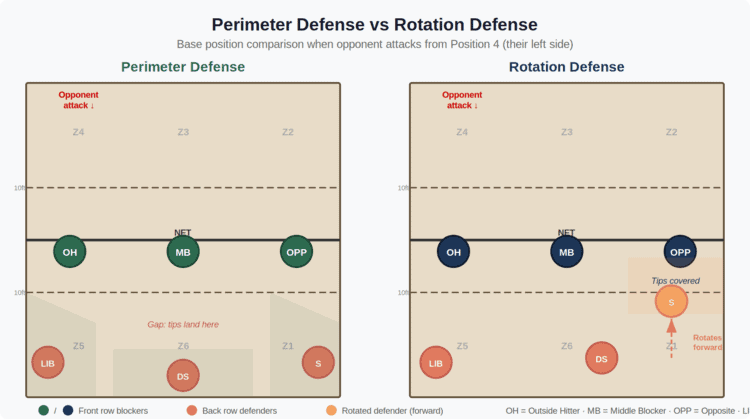
The two most common systems are perimeter defense and rotation defense. Both use the same six players, but where those players stand in their base positions is noticeably different.
Perimeter Defense
In a perimeter defense, the back row players (positions 1, 5, and 6) stay near the sidelines and endlines. They form a wide “perimeter” around the court.
The zone 6 player sits deeper (closer to the endline), while the zone 1 and zone 5 players hug their respective sidelines.
This system prioritizes covering hard-driven balls and deep attacks. The trade-off is that shorter tips and roll shots to the middle of the court can fall in because nobody is camped there.
Perimeter defense works best for teams with fast back row players who can cover a lot of ground, and against opponents who hit the ball hard rather than placing it with finesse.
Rotation Defense
In rotation defense, one of the back row players “rotates” forward toward the 10-foot line to cover tips and short shots behind the block. Usually, this is the player on the side opposite the attack.
For example, if the opposition is attacking from position 4 (their left side), the zone 1 defender in rotation defense would move forward to cover tips, while zone 5 stays deep for the cross-court dig.
This system handles soft shots and tips much better than perimeter defense. The trade-off is that the deep court is covered by only two back row players instead of three, so hard line shots can get through more easily.
Which System Should You Use?
There’s no universally “correct” answer. In a 5-1 rotation, many college and professional teams use rotation defense because it handles higher-level attackers who mix up tips and hard swings. In a 6-2 rotation, where you have more front row attackers, teams sometimes adjust their back row defense system based on the rotation.
The key takeaway is this: your base positions will look slightly different depending on the system. Make sure every player on your team knows which system you’re running and what their specific base looks like within that system.
Reading the Play From Base Position
Getting to your base position is only half the battle. The real skill is reading the play from your base and knowing when to move.
This is what separates a player who’s technically in the right spot from a player who actually digs the ball.
The Read Sequence
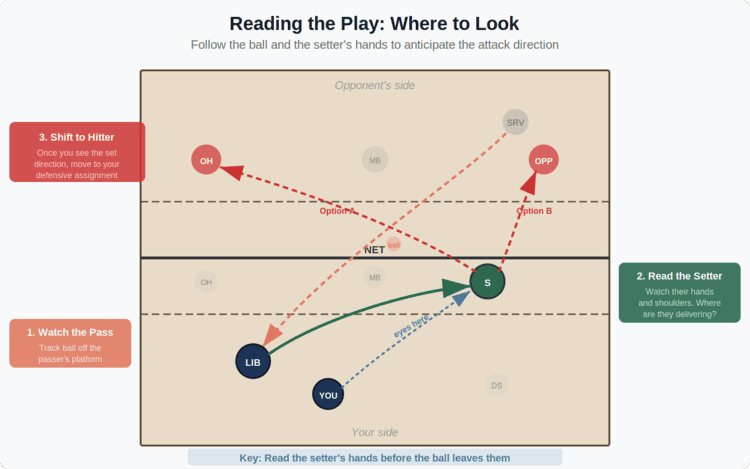
From your base position, you should be following a three-step read sequence:
- Watch the pass. A perfect pass to the setter opens up all attacking options. A bad pass limits the setter and tells you where the set is most likely going.
- Watch the setter. Where the setter faces, what their shoulders are doing, and how high the set goes. If the setter squares up to you, be alert for a setter dump.
- Watch the hitter. Their approach angle, arm swing, and body position tell you where the ball is going before it’s hit.
When to Hold Base vs. When to Release
A common mistake is releasing from base position too early. You see players committing to a defensive spot before the hitter has even contacted the ball.
The general rule: hold your base until the hitter is on their approach. Once you read their angle and arm position, shift into your defensive spot. That tiny delay gives you better information and actually makes you faster because you’re moving with purpose instead of guessing.
The exception is against a team with a dominant quick attacker. Against fast middle attacks, you may need to cheat your base position forward by half a step to compensate for the shorter reaction time.
Base Position Transitions
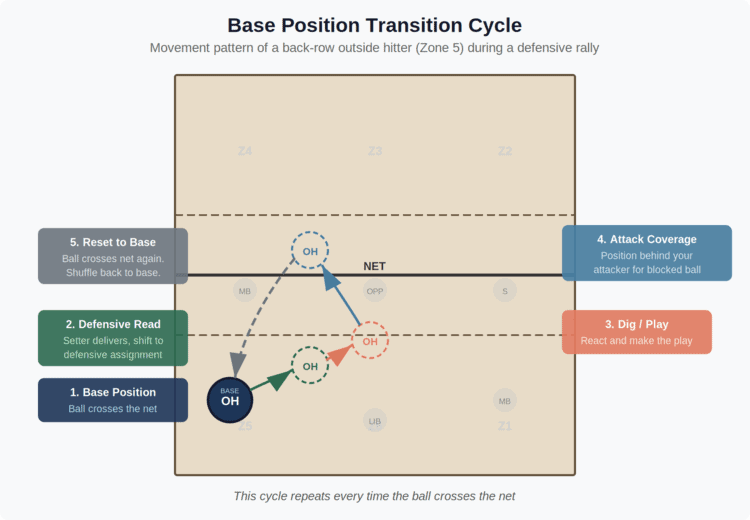
Base positions aren’t static. Throughout every rally, players move through a cycle: base position, defensive position, coverage, attack, and back to base.
Understanding this flow is what makes your team’s defense feel organized rather than chaotic. It also helps to know that the official FIVB rules only check rotational order at the moment of service, so once the ball is served you are free to move into your base and defensive spots.
The Transition Cycle
Here’s the full movement pattern in a typical defensive rally:
- Base position. Ball crosses the net. All six players reset to their base positions.
- Defensive read. As the opposition’s setter delivers the ball, you shift from base to your specific defensive assignment based on the read sequence.
- Dig or play. Contact is made. Either you make the play, or a teammate does.
- Coverage. After the dig, players immediately adjust for attack coverage, positioning behind and around your team’s attacker to cover a blocked ball.
- Reset. The ball crosses the net again. Everyone resets to base.
The 3-Step Reset
The fastest way to get back to base between plays is what I call the “3-step reset.” It’s simple:
- Eyes up. Find the ball and confirm it’s crossed the net.
- Shuffle, don’t run. Move to your base position using defensive shuffles, not a full sprint. Shuffles keep you balanced and ready to react if the ball comes back faster than expected.
- Get low. Drop into your ready position (knees bent, weight forward) the moment you hit your base spot. Don’t stand tall and then bend down. That wastes time.
Common Base Position Mistakes
After coaching hundreds of players through base positioning, these are the four mistakes I see most often.
Standing too deep. Back row players who camp on the endline can’t reach tips or roll shots. Your base should be roughly 4-6 feet inside the endline, not on it. You can always step back for a deep ball, but you can’t sprint forward fast enough for a well-placed tip.
Standing too shallow. The opposite problem, usually with front row players who creep too far back from the net. If you’re a blocker, your base is at the net. If you’re standing 3 feet off, you’ve given up blocking angle and you’re too late to close the block.
Watching the ball instead of the hitter. Your eyes should follow the read sequence: pass, setter, hitter. Players who ball-watch end up frozen because they don’t have early information about where the attack is going.
Slow reset after rallies. This is the silent killer. After a long rally, tired players drift to wherever they ended up instead of resetting to base. When the next play starts with three players out of position, gaps appear that the opposition will find.
Teaching Base Positions: 3 Drills
Whether you’re a coach or a player looking to improve, these three drills will build base position habits from the ground up.
1. Shadow Drill (No Ball)
This is where it starts. Six players on the court, no ball.
The coach calls out game situations (“setter sets outside,” “quick middle attack,” “free ball over”) and players move from base to their defensive spots and back.
Run this for 5 minutes at the start of practice until the movement patterns become automatic. The goal is to eliminate thinking and make base positioning a reflex.
2. Coach-on-Box Positioning Drill
Place a coach or experienced player on a box at the net. The coach tosses or hits balls to various spots on the court while six defenders start from their base positions.
The focus isn’t on making spectacular digs. It’s on starting in the correct base, reading the coach’s arm and body position, and then moving to the right defensive spot.
Run 10-12 reps, then rotate players through different positions so everyone practices their role-specific base.
3. Live Read-and-React 6v6
The final progression. Full 6v6 play, but the coach pauses the drill after every rally to check base positions.
Before the serve or the next play begins, the coach confirms all six players are in their correct base. If someone is out of position, they identify the error and reset.
This drill teaches base position discipline under game-like pressure. After a few weeks of consistent practice, resetting to base becomes second nature. If you coach a team, the USA Volleyball resources for coaches are a good place to find more drills and lesson plans to build on these.
Frequently Asked Questions
What is the difference between base position and ready position?
Base position is your location on the court, the specific zone or spot you default to. Ready position is your body posture at that location: knees bent, weight on the balls of your feet, hands in front of you, ready to react. You need both. Being in the right base position with a lazy ready position is almost as bad as being in the wrong spot entirely.
Do base positions change in a 5-1 vs 6-2 rotation?
Yes, but the differences are subtle. In a 5-1 rotation, there’s only one setter, so their base position in the back row matters more because they need to balance defense with getting to the setting target. In a 6-2 rotation, the setter is always in the back row, which changes the front row blocking assignments slightly. The core base positions for each role stay the same, but the details shift based on the system. Teams running a 4-2 or 5-2 rotation will also have minor variations.
Where should a libero stand in base position?
The libero’s base is typically in zone 5 (back left) or zone 6 (back center), roughly 4 feet from the sideline and 4 feet behind the 10-foot line. The exact spot depends on your team’s defensive system and which rotation you’re in. The key is being positioned where you can cover the most court with the fewest steps.
What is the best base position for a middle blocker in the back row?
Zone 6 (back center), deep enough to cover hard-driven cross-court balls but close enough to step forward for tips behind the block. In practice, this means about 5-6 feet inside the endline. Most teams sub the middle blocker out for a libero in the back row, but if you’re staying in, zone 6 is your home.
How do you practice base positions by yourself?
Start with court visualization. Stand on a court (or mark one out with tape) and practice moving from base to different defensive spots. Use the shadow drill approach: imagine a scenario (outside attack, middle quick, free ball), move to your defensive spot, then reset to base. Repeat 20-30 times. Focus on shuffle steps, not running, and getting low into ready position every time you hit your base.
Do base positions change in beach volleyball?
Significantly. Beach volleyball has only two players covering the entire court, so there are no “positions” in the indoor sense. One player blocks while the other defends. The defender’s base is typically in the center of the court behind their blocker, adjusting based on where the blocker is taking away. The concepts of reading the play and resetting after each contact still apply, but the base positions themselves are completely different from indoor volleyball.
